專案中很常出現按鈕點下跳出 確認視窗
的行為,有時候是刪除的警告確認、有時候是資料送出的確認。這些有共同操作行為的 Component 都應該做成共用的元件以方便在各種情況下重複使用, 才不會某 A 做一個版本,某 B 做另一個版本,大家都自己寫自己的造成維護上的困難。
此文章不會詳細列出各項程式碼,如果有興趣可以 clone source code 下來研究研究。
封面圖來源:https://mrdoob.com/lab/javascript/effects/ie6/
期望可以用以下程式碼達到我要的目的:
import React from 'react'

import { confirmBox } from './promiseModal'

class App extends React.Component {
  render() {
    <button
      onClick={() => {
        confirmBox({
          title: 'Logout',
          description: 'Are you sure to logout?',
        }).then(() => {
          console.log('Confirm, Do some logout action...')
        }).catch(() => {
          console.log('Cancel, Nothing happened...')
        })
      }}
    >
      Logout
    </button>
  }
}
confirmbox 執行並帶入客製化 params,期望最後會回傳 promise 物件,並由 .then() 或是 .catch() 來知道使用者點下 Confirm 還是 Cancel 再做後續的動作。
實作步驟分析
準備一個基本的 popup modal component(確認視窗)。
因為 modal 是一個蓋版視窗,使用者必須要按下
Confirm或Cancel按鈕才能繼續操作,所以選擇使用Promise物件來等待使用者按下按鈕。執行
confirmBox的時候,預期會 create 一個promise物件,並在裡面將 React Component 掛載到某個 div 上面(ReactDOM.render),並將resolve、rejectfunction 當作 props 一併傳到 modal 中使用。因為 modal 擁有了
resolve、reject這兩個可以繼續promise的 function,所以可以在按下Confirm按鈕的時候呼叫resolve,按下Cancel按鈕的時候呼叫reject來達成Promise Chain的目的。無論按下哪一個按鈕後都應該要清除、卸載,動態掛上去的 React Component。
以下解說都會省略 css code, 有興趣可以看 source code
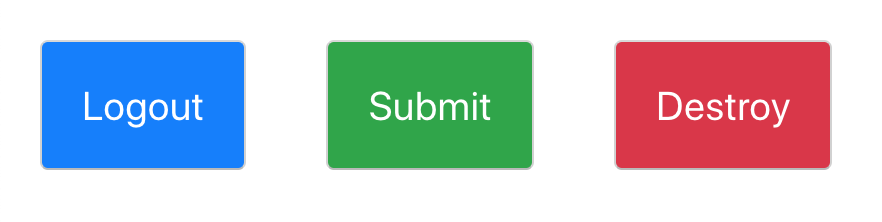
Step 0. 準備範例按鈕
class App extends Component {
  render() {
    return (
      <div className="App">
        <button
          type='button'
          className='btn-example logout'
        >
          Logout
        </button>

        <button
          type='button'
          className='btn-example submit'
        >
          Submit
        </button>

        <button
          type='button'
          className='btn-example delete'
        >
          Destroy
        </button>
      </div>
    );
  }
}
Step 1. 準備基本 popup modal
使用 react-modal 來快速建造一個確認視窗的 modal。
import React, { useState } from 'react'
import PropTypes from 'prop-types'
import Modal from 'react-modal'

const ConfirmBox = (props) => {
  const {
    color, // 客製化顏色
    title, // 客製化文字
    description, // 客製化文字
    onConfirm, // 預期收到 resolve function
    onCancel, // 預期收到 reject function
    confirmText, // 客製化文字
    cancelText, // 客製化文字
  } = props

  // `useState` 是 react 16.8 新功能 hooks, 等同於 state/setState 效果
  // 初始值為 true
  const [isOpen, setIsOpen] = useState(true)

  const onClickConfirm = () => {
    // 按下 Confirm 將 modal 關閉, 並執行 onConfirm (resolve function)
    setIsOpen(false)
    onConfirm()
  }

  const onClickCancel = () => {
    // 按下 Confirm 將 modal 關閉, 並執行 onCancel (reject function)
    setIsOpen(false)
    onCancel()
  }

  return (
    <Modal
      overlayClassName='promise-modal-overlay'
      className='confirm-box'
      isOpen={isOpen}
      onRequestClose={onClickCancel} // 點下 modal 之外的區域時觸發 (modal overlay)
      shouldReturnFocusAfterClose={false}
    >
     <div className={`modal-container color-${color}`}>

      <div className='modal-header'>
        <h3>{ title }</h3>
        <button
          type='button'
          className='close-btn'
          onClick={onClickCancel}
        >
          X
        </button>
      </div>

      <div className='modal-content'>
        <p>{ description }</p>
        <div className='button-list'>
          <button
            type='button'
            className='cancel'
            onClick={onClickCancel}
          >
            { cancelText }
          </button>
          <button
            type='button'
            className='confirm'
            onClick={() => onClickConfirm()}
          >
            { confirmText }
          </button>
        </div>
      </div>
     </div>
    </Modal>
  )
}
測試一下剛剛做的 Component Render 有沒有正確,丟到測試頁面看看 js/css 有沒有正確。

Step 2. 製作 Promise function
流程可以拆分為以下:
- 動態產生不重複的 div element,為了讓
ReactDom.render掛載上去。 - new 一個
Promise物件,並在第一個 promise 裡面將Modal Component掛載上去。 - 成功 render React Modal 之後就會在介面上看到蓋版 Modal,並等待使用者按下按鈕之後接續呼叫
resolve、rejectfunction。 - 卸載、移除先前動態產生的 Component、Element。
import React from 'react'
import ReactDOM from 'react-dom'
import Modal from 'react-modal'

// 卸載、移除先前動態產生的 Component、Element
const unsetPromiseModal = (wrapper) => {
  setTimeout(() => {
    ReactDOM.unmountComponentAtNode(wrapper)
    wrapper.remove()
  }, 300)
}

// 動態產生不重複的 div element
const findOrCreateWrapper = (identifyID) => {
  let wrapper = document.getElementById(identifyID)
  if (wrapper === null) {
    wrapper = document.body.appendChild(document.createElement('div'))
    wrapper.id = identifyID
  }
  return wrapper
}

// params 預期接收要被掛載的 Component, 跟客製化 options
const promisableModal = (Component, options = {}) => {

  // 動態產生不重複的 div element
  const wrapper = findOrCreateWrapper(`promise-modal-wrapper-${Date.now()}`)

  // 無障礙網頁辨識用, 參考:http://reactcommunity.org/react-modal/accessibility/#
  Modal.setAppElement(wrapper)

  const promise = new Promise((resolve, reject) => {
    ReactDOM.render( // 掛載 React Component
      <Component
        {...options} // 帶入客製化參數(props)
        onConfirm={resolve} // resolve 傳給 onConfirm
        onCancel={reject} // reject 傳給 onCancel
      />,
      wrapper,
    )
  })

  return promise.then(() => {
    // 使用者按下 Confirm 之後執行此段
    unsetPromiseModal(wrapper)
    return true
  }, () => {
    // 使用者按下 Cancel 之後執行此段
    unsetPromiseModal(wrapper)
    return Promise.reject(false)
  })
}

export default promisableModal
由於最後回傳的是一個 promise 物件,如果接續著呼叫 .then() 會在使用者按下 Confirm 後接續執行;如果接續著呼叫 .catch() 會在使用者按下 Cancel 後接續執行。
Step 3. 組合
import './style.scss' // base modal overlay csss

import promisableModal from './promisableModal'
import ConfirmBox from './components/ConfirmBox'

// 將 ConfirmBox 和 promisableModal 做組合
const confirmBox = props => promisableModal(ConfirmBox, props)

export {
  promisableModal,
  confirmBox,
}
因為已經寫好了可以 promisable 的 function,所以未來如果想要擴充其他種類型的 modal,都可以透過 promisable 輸出,例如未來我如果想做一個編輯蓋版視窗:
... 省略

import EditBox from './components/EditBox'

const editBox = props => promisableModal(EditBox, props)

export {
  promisableModal,
  confirmBox,
  editBox, // 新的擴充
}
Step 4. 使用
三種不同情境的確認視窗,都只要呼叫同一個 promise function 來達成目的,達到 reuse 的目的。
import React, { Component } from 'react'
import './App.scss'

import { confirmBox } from './promiseModal'

class App extends Component {
  render() {
    return (
      <div className="App">
        <button
          type='button'
          className='btn-example logout'
          onClick={() => {
            confirmBox({
              color: 'primary',
              title: 'Logout',
              description: 'Are you sure to logout?',
            }).then(() => {
              console.log('%c Click Confirm!, prepare to logout ...', 'color: blue')
            }).catch(() => {
              console.log('%c Click Cancel!, nothing happened ...', 'color: blue')
            })
          }}
        >
          Logout
        </button>

        <button
          type='button'
          className='btn-example submit'
          onClick={() => {
            confirmBox({
              color: 'info',
              title: 'Submit Form',
              description: 'Are you sure to submit form?',
              confirmText: 'Submit',
            }).then(() => {
              console.log('%c Click Confirm!, prepare to fetch data to backend api ...', 'color: green')
            }).catch(() => {
              console.log('%c Click Cancel!, nothing happened ...', 'color: green')
            })
          }}
        >
          Submit
        </button>

        <button
          type='button'
          className='btn-example delete'
          onClick={() => {
            confirmBox({
              color: 'danger',
              title: 'Delete Product',
              description: 'Are you sure to delete this product?',
              confirmText: 'Delete',
            }).then(() => {
              console.log('%c Click Confirm!, prepare to fetch data to delete product ...', 'color: red')
            }).catch(() => {
              console.log('%c Click Cancel!, nothing happened ...', 'color: red')
            })
          }}
        >
          Destroy
        </button>
      </div>
    );
  }
}

Don't Repeat Yourself,這個範例的元件在我先前的幾份專案中都有用到,而且都只是複製最初的那一份出來調整 css 而已。
寫 React 的時候不妨思考一下專案中哪些是常常共用的元件,試著練習抽離出來做成 shared component,會省下未來不少時間。
👩🏫 課務小幫手:
✨ 想掌握 React 觀念和原理嗎?
我們有開設 💠 React 全攻略入門班 課程唷 ❤️️